Friday, June 21, 2013

Block of the Month 2012 quilt

I'm a year late with this project....but I wasn't into quilting last year.  :). Thanks to Craftsy.com for this free online class with Amy Gibson to learn new pattern techniques.  At the end of the class, I will have a completely finished scrappy quilt and a lot of new knowledge!

Here is a picture of the January blocks:  Asterisk Block & Wonky Pound Sign Block.

Monday, June 17, 2013

Scott's quilt update

Here is the latest progress on Scott's t-shirt quilt!  I have 2 more columns to attach, plus the rest of the borders and then the quilt top should be finished.  The overall height is about 7 feet tall!   I'm still a little indecisive on how to create the back.  The lazy, just get-it-done side of me says to get enough orange material to cover and just make it solid.  But the I'm enjoying this project side says do something a little more elaborate, if nothing else use more than one color on the back.  The final decision may be determined by how much material I have left over and what can be done with it.  Stay tuned...

Friday, June 7, 2013

Sunglasses Hut

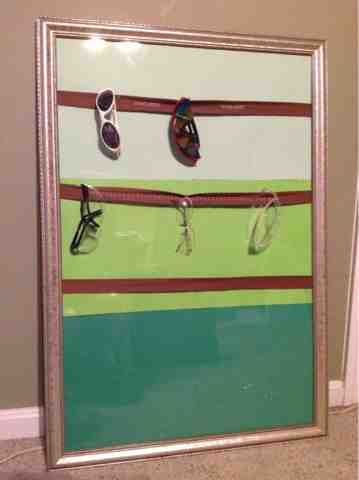
Honestly, this is a ridiculous craft to have to make, but if it helps with organization then I'll suck it up and deal with it.  The Sunglasses Hut is a project that I made for my HUSBAND and all of HIS pairs of sunglasses and safety goggles!  That's right...it's not even for me!  But hey, like I said earlier, if it will keep the glasses in one location rather than being scattered all over the house sitting on various tables and stuffed in random drawers, then ok.  To be frank, I don't think this 24x36 inch frame is large enough to house them all, but that will be when I have to say, enough is enough and the ones that don't fit have to go.  Extreme Hoarding is not a show that I am interested in having filmed at my house.

To make the Hut I just added some 12x12 scrapbook paper onto the cardboard that came with the frame for some added color.  Then I cut 21/2" strips from my fabric stash, folded them in half and glued the ends to the back of the frame.  Two of the strips had designs as I was playing with some of the features of my sewing machine.  The third I just left blank, not really sure why.  I separated the cardboard from the fabric with the plexi-glass that came with the frame.  It actually worked out well because the glass helps hold the ear pieces in place so the fabric isn't being pulled down as much as I was afraid would happen.

I'm not sure where this will hang.  I might paint the frame itself so that it blends into its environment but that wasn't a necessity today.  The extra space at the bottom might be good for small baskets with suction cups or even hooks to hang ties or belts.  I'll let the hubby make that call, though!


Tuesday, June 4, 2013

Sewing Machine Cover

I love the charm packs and wanted to find a project that I could incorporate them but not take a long time to complete.  The sewing machine cover via sew delicious was perfect!  My craft room is decorated in lime and hot pink so I found a charm pack to accessorize those colors with a little turquoise and red to add some flair.  After laying out the pattern, the next steps were to stitch the top and quilt the batting and the back to it.  Adding the side flaps were a little tricky but I figured them out. The last step was to add a white binding tape around the bottom and viola!  A little added color to my room and a functional cover to help reduce the amount of dust getting into my sewing machine...a win, win!  This was a fun and basic sewing project that gave me some more practice sewing straight lines and quilting the layers and in all in only took a few hours on about four different afternoons to complete.  (Probably longer than expected, but the weather was nice outside so I chose not to stay inside the whole time.)


The overall piece ended up being a couple inches too short so adding a cute border between the blocks and binding would have probably been a good decision.  Oh, and I tried my hand at hand stitching the binding to the front of the cover.  I had it finished before the Reds had ended their ballgame that I was watching with my husband on tv...and I think it turned out great!